Local Professional IT Support For Your Business
- Sage Fixes
- Email Fixes
- SSL Certificates
- Windows Live Movie Maker
- Server Fixes
- Windows 7 Fixes
- VMware
- Windows 10 Fixes
- Vmware Zimbra
- Exchange Server
- Upsizing to MS SQL
- How to Fix IP Conflicts
- Internet Fixes
- Windows 11 Fixes
|
Adding And Using The Disk Cleanup Wizard On SBS2011 And 2008R2 | |||
|
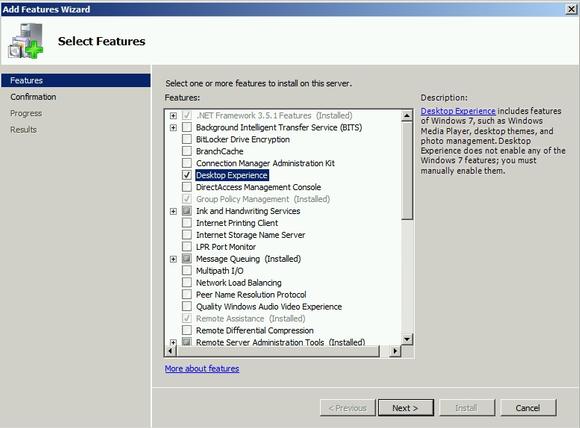
This article explains how to add and use the Disk Cleanup Wizard on SBS2011 and 2008R2. It is a very useful tool that can help you claw back gigabits of space on your server. Important - This process requires reboots of your server Go to Start, administrative tools, and then click on Server Manager Once server manager is open select Features, then Add Feature from the right hand side of the screen Select the Desktop Experience Feature, and click the Add Required Features button to agree to install the required feature of Ink support. Then click Next. Confirm your selections and click Install and then Close Click Yes to restart now. The sever will reboot once configuring the update, then automatically reboot again before offering you the login prompt. The process took about 10 minutes on a virtual production server that I recently ran it on. When you next login it takes a little while but it will eventually complete the process and the installation results will be displayed. You can simply close this window. Click Start – All Programs – Accessories – System Tools, and select Disk Cleanup The Disk Cleanup will then run a scan and show you what it can clean. With everything selected it only saves a small amount of space, however this doesn’t include the WinSxS folder. To include the WinSxS folder select the Clean up system files button, it will now scan again and show you more options for cleanup. Select the items you want and click OK. Finally click Delete Files on the warning prompt and let it go to work. This can take a while depending on how much you are deleting.
| |||
 | |||
| Comments | |||
| |||


Contact us: 01753 46 20 25
Caultex Technology Ltd
Dingle House
Blackpond Lane
Farnham Royal
Berkshire
SL2 3EA
Remote Desktop powered by FixMe.IT
Local computer IT support service covering Slough, Maidenhead, Windsor, Reading, Farnham Common, Beaconsfield, Amersham, High Wycombe and Uxbridge